introduction
First, before I even begin, let me make a shout out to Faroutride's page about this that you can find here. This is the best guide to campervan electric systems on the internet and they have spent years continually updating it. It amazes me they have so much free time on their hands to spend on a website. Everything you need to know can be found there, and I modelled my electrical system after theirs, with a few adjustments omitting things I wouldn't need. There is a plethora of hardware out there that you can buy for various applications, so their non-bias review segments also helped a lot in making my decisions on what to buy. I won't go into too much detail about the theory behind all this, but rather explain exactly what I did and how I built it. For a detailed explanation and learning how everything works, definitely give their page a read, then read it again.
Materials used
**Note this list covers everything I bought for the electrical system, and for the wood to build the compartment to store it all. I have also added links to this list, and a brief personal review of each item for assistance. This is by far the most expensive component of the entire van build.
Battery Components
- Pow-R-Surge 12 Volt 100Ah deep cycle AGM battery (Free from Battery World in Edmonton, Alberta)
So far I am happy with this battery, but I might upgrade to a Lithium battery in the future. AGM batteries ideally shouldn't be discharged below 40% as they will lose lifespan if you do. Lithium batteries can be discharged all the way to 0% with minimal damage (think your phone battery). This battery was free for me though since I purchased so many batteries from this store for a job I was on in Edmonton.
- Blue Sea Systems 5187 200A Fuse Terminal ($14.91 on Amazon)
This fuse I attached directly to the positive port on the house battery using the fuse block described just below.
- Blue Sea Systems 5191 Fuse Block Terminal 30-300 AMP ($20.76 on Amazon)
This fuse block bolts directly to the positive terminal of the battery, and houses the fuse described above.
Solar Components
- Two (2) Renogy 160 Watt 12 Volt Polycrystalline Solar Panel ($165.52 each on Amazon)
Renogy is the tried and true solar panel brand. I got two panels giving me a total of 320 peak watts of solar output. They charge my house battery up in a jiffy!
- Victron SmartSolar MPPT 100/30 Solar Charge Controller 100V 30A with Bluetooth ($226.10 on Amazon)
I am extremely satisfied with this product. This is one of the best solar controllers out there. It is easy to install and use. Simply wire the + and - wires from the solar panel extension cables to the solar ports (you'll have to cut the built in connector off the extension cable and expose the bare wire), then add two wires (+ and -) from the battery ports on the device to your cooresponding busbars.
- WindyNation 8 AWG 1 Pair 15 Feet Black + 15 Feet Red Solar Panel Extension Cable Wire MC4 Connector ($35.99 on Amazon)
These are excellent cables that I used to extend the solar panel cables from the exterior roof of the van down to the electrical compartment inside. Note these have the solar connectors built into the ends that plug into the branch connectors outlined just below.
- Renogy MC4 Y Branch Connectors Solar MC4 Connectors Y connector Solar panel mounts in Pair MMF+FFM ($12.22)
These connectors are used to wire up two solar panels in parallel to one another. The connections are easy to make and is outlined in the video here.
- 5 Pc 3/8 Inch NPT Black Right Angle Nylon Cable Gland Strain Relief with Gasket and Locknut 5 Pack ($12.99 on Amazon)
These 90 degree grommets I used to allow the two solar panel extension cables to pass through the roof of the van while providing a safe and leak free seal.
- Basic roof rack installed on the van for solar panels to mount ($345 at ReRack)
I opted for a very basic, twin bar roof rack that I could simply bolt the solar panels to with U-bolts.
Alternator Power Components
- Sterling BB1260-12 Volt, 60 Amps - Pro Batt Ultra Battery to Battery Charger ($408 on Amazon)
I have not yet tested this product as I haven't wired it up to the starting battery yet. Will update when I do.
- Two (2) Blue Sea Systems AMI/MIDI Safety Fuse Block ($26.05 each on Amazon)
These fuse blocks house the 70amp fuses I installed along the positive cable runs between the starting battery and the Sterling BB1260, as well as between the BB1260 and the positive busbar.
- Two (2) Blue Sea Systems 70A AMI/MIDI Fuse ($7.26 each on Amazon)
This is the fuse that gets put into the fuse block described just above.
- 25' of 4 gauge cable ($35 at Home Depot)
This cable I used to connect the starting battery to the busbars through the Sterling BB1260 described above.
Other Safety Components
- Two (2) Blue Sea Systems A-Series Red Toggle Single Pole 40A Circuit Breaker ($15.88 each on Amazon)
These simple circuit breakers I use to isolate the solar energy if I was working on the electrical panels during the day for one, and as another isolation of the loads for the second.
- Blue Sea Systems Circuit Breaker Enclosure ($36.44 on Amazon)
I used this for the dual curcuit breakers I got to trip the flow of current for the solar panels to isolate the solar energy if I was working on the electrical panels during the day.
- Blue Sea Systems e-Series On/Off Battery Switch ($32.21 on Amazon)
This is a master switch to isolate all the loads from the house battery. I have this switch installed on the red cable that runs between the house battery and the positive busbar. This will not isolate the solar energy though, since that is wired to the busbars on a separate cable from the solar controller.
- Victron BMV-712 Smart Battery Monitor with Built-In Bluetooth ($206.55 on Amazon)
I am so far very satisfied with this product. It can monitor the health for both your house and starting batteries and has an easy to navigate display. It comes with the display, the shunt, and the communication wire (which connects the shunt to the display). It is important you install the included Shunt correctly, which I detail in the article below.
- Two (2) Blue Sea Systems Common 150A BusBar with Four 1/4 ($19.11 each on Amazon)
These are probably one of the most important items you can get for your electrical system. All cable leads from like charges get conneted to a busbar to keep everything common. It is important you get a busbar large enough for all the current you may have in your system. Note you will need 2, one for all positive leads and one for negative. The ones at Home Depot are not sufficient!
12 Volt Load Components
- Ancor Marine Grade Primary Wire and Battery Cable (Red, 25 Feet, 8 AWG) ($36.57 on Amazon)
I used this wire for various 12 volt load items connecting them to the Blue Sea Systems fuse block.
- Blue Sea Systems ST Blade Fuse Block - 12 Circuits with Negative Bus & Cover ($35.96 on Amazon)
This has been an excellent item to have. I run all my 12V loads off of this fuse block, with each item having its own automotice type fuse. The main + and - lines connect it to the circuit via the cooresponding busbars. Then there are individual fuse ports to add up to 12 items (such as a 12V socket, refrigerator, water pump etc).
- Automotice fuse kit ($8.99 at Home Depot)
I bought a kit that included an assortment of automotive fuses from 5 amps to 30 amps that fit into the fuse block described above.
- Two 4-packs of acegoo RV Boat Recessed Ceiling Light 4 Pack Super Slim LED Panel Light DC 12V 3W Full Aluminum Downlights, Warm White (Silver) ($32.99 each on Amazon)
I really like these LED lights, and they dim very well.
- LED Dimmer Switch ($29.95 from Super Bright LEDs website)
This dimmer switch is awesome. It has two levers for a dual zone capability. I wired 4 lights on each zone in parallel using the Scratchlok connectors described below, then connected each set of wiring to the switch with the U shaped crimp type wire terminals.
- Ancor 121510 Marine Grade Duplex Cables, 14/2 AWG (2 x 2mm²), Flat, 100ft ($53.28 on Amazon)
This cable has two 14 gauge wires inside the main jacket that I used to run all the wiring for the 8 LEG lights along the ceiling. Note there are two zones, so I needed to wire two groups of 4 LED lights in parallel, which I did using the connectors described just below.
- 3M Scratchlok Electrical IDC 804 Pouch, Blue ($11.99 for pack of 25 on Amazon)
These connectors are used to wire the lights in parallel. See the wiring diagram and more information in the article below. Note you need to make sure you buy the right size. Since I used 14 gauge stranded wire for the LED lights, I got the size required for this.
- Two (2) Blue Sea Systems 12 Volt Dash Socket ($8.71 each on Amazon)
I installed two 12 volt sockets in the van for various cigarette lighter type outlets to power things like phone chargers, my 12 volt vacuum cleaner etc.
- 25' of Romex cable 12/3 (12 gauge wire with 3 individual wires inside the main jacket) ($25 at Home Depot)
This cable I used to wire the two sockets described above to the 12V fuse block.
- 25 feet of 14/2 cable ($10.37 at Lowes)
This cable I used to run power from the electrical cabinet to the vent fan on the ceiling.
- JR Products 12225 Black Single SPST On-Off Switch with Bezel ($14.42 on Amazon)
This switch I used for the water pump, and wired it in along the positive wire between the water pump red lead wire and the 12V fuse block.
110 Volt Load Components
- Samlex Solar PST-1000-12 PST Series Pure Sine Wave Inverter ($390.25 on Amazon; note this was on sale)
I am so far very satisfied with this inverter. It is quiet and works very well. It was tight getting it to fit in my existing electrical compartment because the device was bigger than I thought it would be so plan accordingly. Note the inverter has two 110V output plugs on the side that you will need plug extension cords in order to add wall sockets throughout the van.
- Blue Sea Systems 5191 Fuse Block Terminal 30-300 AMP ($15.44 on Amazon)
This fuse I attached directly to the positive busbar where the cable connecting the inverter to the busbar is located.
- Blue Sea Systems 175A MRBF Terminal Fuse ($16.05 on Amazon)
175 amp fuse placed in the block terminal described just above.
- Two (2) Standard 110V wall outlets with two built in USB ports and the face plates included ($25.99 each at McLendon Hardware)
These wall outlets are really nice as they also have two USB ports as well as two standard wall outlets.
- 12' and 8' 110V plug extensions ($11.99 each at McLendon Hardware)
These cables have only the male end of a standard wall plug on one end that plugs into the inverter, with bare wires on the other end in order to directly wire to a wall socket.
Hardware
- 20 total copper cable lugs for 2 and/or 4 gauge cable ($3.50 each at Home Depot)
I used cable lugs that I soldered to the cable ends for connecting the large 2 and 4 gauge cables to the busbars, fuse blocks or battery terminals.
- 225FWY 10 Ft 3/4 19mm Split Wire Loom Conduit Polyethylene Tubing Black Color Sleeve Tube ($8.25 on Amazon)
This 3/4" diameter flexible slit tubing is used for protecting cables where they may come in contact with sharp edges
- 25 Ft 1/2 13mm Split Wire Loom Conduit Polyethylene Tubing Black Color Sleeve Tube ($9.55 on Amazon)
This 1/2" diameter flexible slit tubing is used for protecting cables where they may come in contact with sharp edges
- Two (2) Liberty Brand Inlay Cabinet Hinges ($6.59/Pair at Home Depot)
- Two Grip Clips for holding door closed ($1.99 each at Mclendon Hardware)
- Rivet Nuts and 1/4" by 20 count bolts (Purchased Earlier; used for securing cabinet to the van panels)
- Wire crimp terminal kit ($10.69 at Home Depot)
Various wire terminals for 12, 14 and 16 gauge wire including U shaped, O shaped and quick connect terminals. Butt splices also included.
- Eight (8) 1.75" U bolts with 5/16" diameter ($1.59 each at Home Depot)
U bolts used to mount the solar panels to the roof rack
Wood Components for the Electrical Cabinet
- 6' piece of 3/4" X 9.25" Sapele hardwood ($35 at Crosscut Lumber)
- 6' piece of 1/2" X 9.5" Jatoba hardwood ($65 at Crosscut Lumber)
- One (1) 8' X 2" X 3" spruce stud ($2.09 at Home Depot)
- Extra 1" X 2" Oak board (Free from my dad; used to make the cabinet door enabling two of the Jatoba boards to stack one above the other with an even 1/4" gap)
- Extra 1/2" and 3/4" plywood (Free from my dad)
Total Material Cost: $2,915 US Dollars
step 1 - build electrical compartment
May 2018
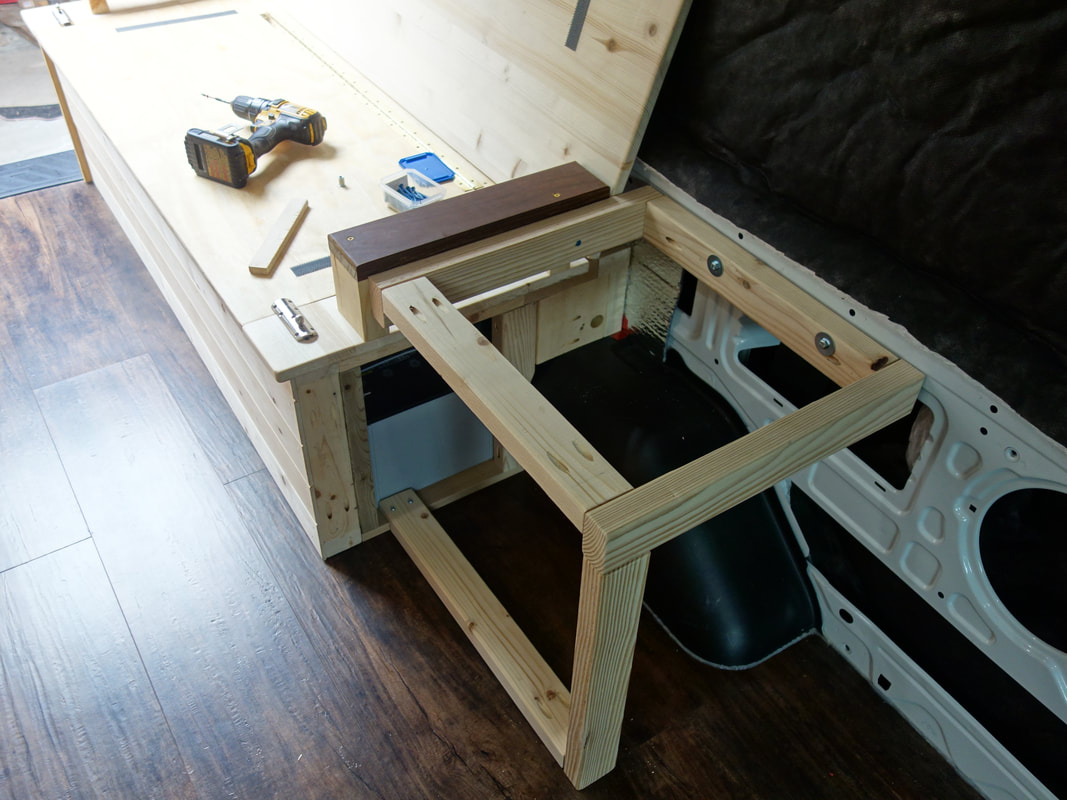
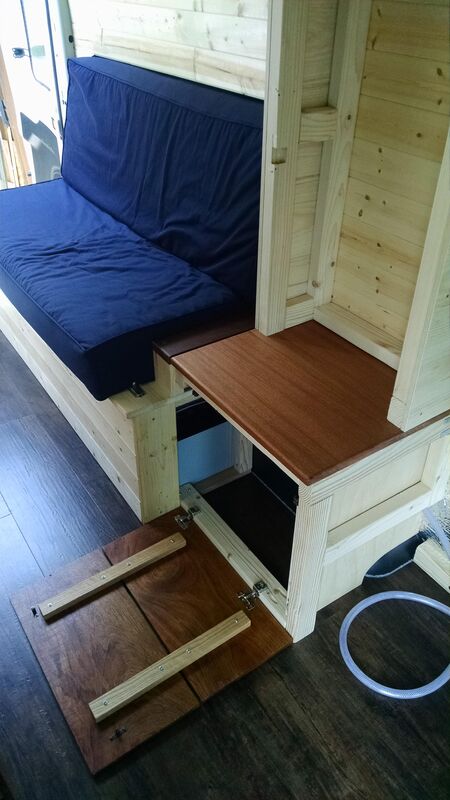
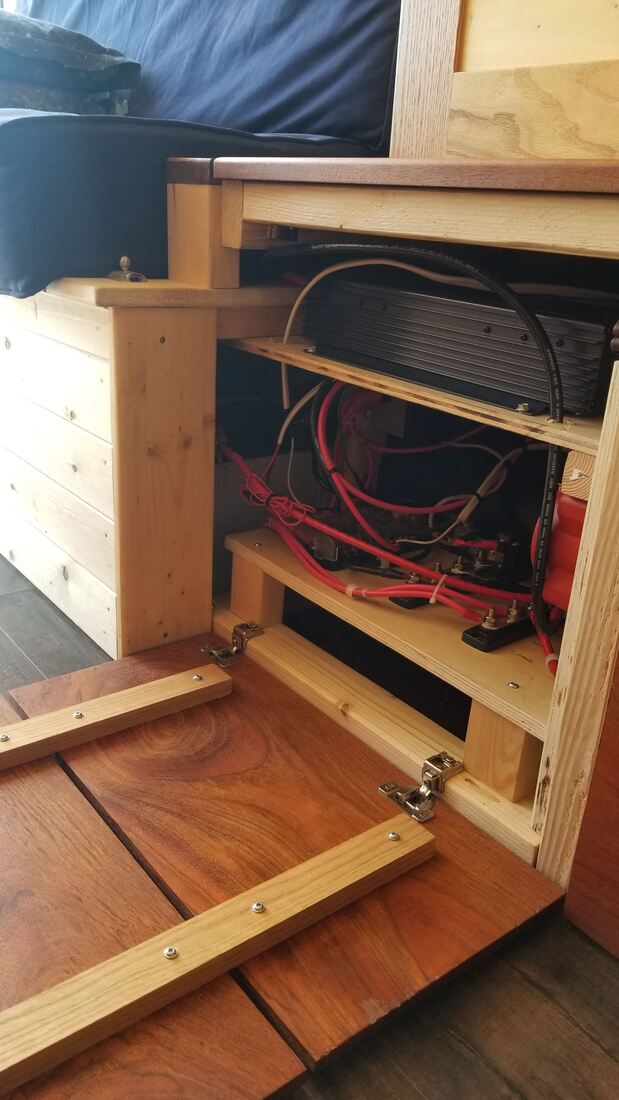
Before I could do much on anything with my electrical system, I needed to designate a place for all the electrical components to be located. The obvious spot was at the front end of the couch, where both the water and electrical systems could coexist. I built a simple framed box that I bolted to the side of the van using the rivet nuts. Each joint I used the Kreg jig and screws with glue. The door opens down from the face to allow access inside which was made from more 1/2" thick Jatoba boards. The top I used additional Sapele wood left over from the coffee table, so it matches!
Before I could do much on anything with my electrical system, I needed to designate a place for all the electrical components to be located. The obvious spot was at the front end of the couch, where both the water and electrical systems could coexist. I built a simple framed box that I bolted to the side of the van using the rivet nuts. Each joint I used the Kreg jig and screws with glue. The door opens down from the face to allow access inside which was made from more 1/2" thick Jatoba boards. The top I used additional Sapele wood left over from the coffee table, so it matches!
Step 2 - install solar panels
June 2018
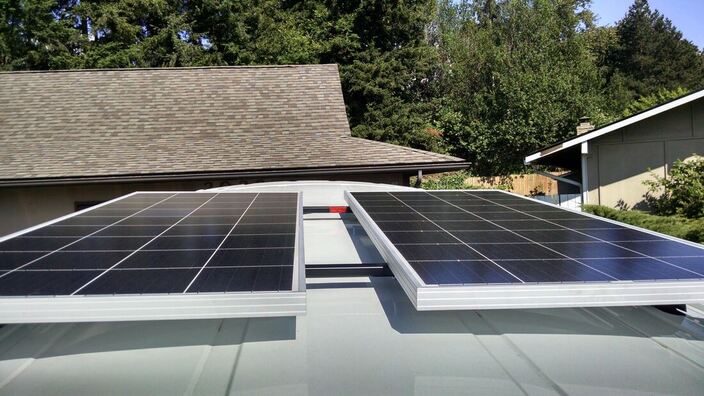
Installing solar panels atop ones campervan is like a rite of passage for vanlife. There are many ways people have done this, everything from literally taping them to the roof, to designing a fold-up rack that will adjust the angle the panels point depending on the time of day. I opted for a simple and cost effective method of having two crossbars affixed to the top of my van in the rear, the just U-bolting the panels to the top. The combination of the crossbars being able to lock, and the labouious task of getting the U bolts installed from the top of the van (cannot reach from the ground) makes the panels very secure. I was easily able to drill 8 holes into the aluminum frame encircling the solar panels (2 for each U bolt connection) and get the panels secured. Four bolts that wrap around the crossbard hold each panel in place. The hardest part was getting the nuts started on the bolts since the ends of each U bolt were hidden from view, and very difficult to reach on the inside of the frame, with just a few inches between the top of the solar panel and the roof of the van. Lots of cursing and rolling around on ladders and atop the van itself and I managed to get it all tightened. I used a wratchet wrench to tighten the nuts and definitely used lock washers.
With the panels secure, I then wired them in parallel using the Renogy Y branch connectors. A simple plug and play approach was all I needed to connect the two panels up in parallel. Then, using the solar extension cables, I ended up with one master positive and negative cable that I had to pass through the roof of the van. I drilled two 5/8" holes adjacent to one another and fed the 90 degree cable gland through the extension cable (making sure to get each piece on the correct side of the van roof). With the cables now inside the van I applied silicone sealent to the outside edge of the gland and tightened the nut from the inside. Note these glands are 100% plastic so it is important not to over tighten them. I taped the exposed ends of the extension cables inside the van to ensure they didn't touch anything until I had the electrical components ready and installed, which included the solar controller. To finish, I applied zip ties and tuck tape to secure the cables and Y branch connectors to the crossbars to prevent them from rattling around. The nice thing about the extended length Ford Transit is that in the future, I am able to have another pair of crossbars installed in the front half of the roof for things like skis, bikes etc if needed.
step 3 - Install components
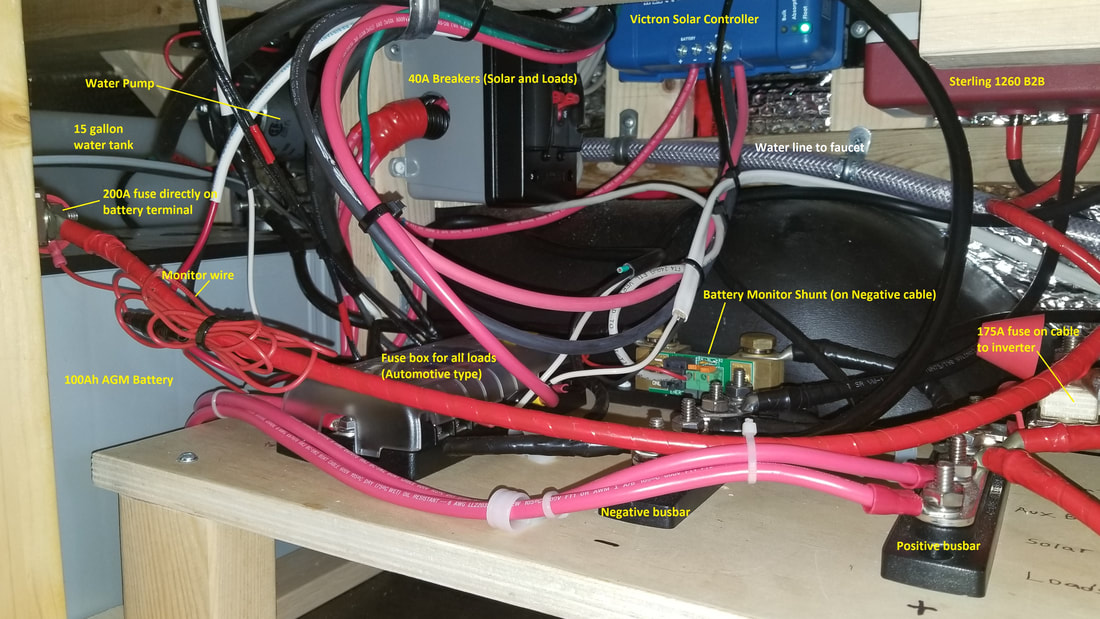
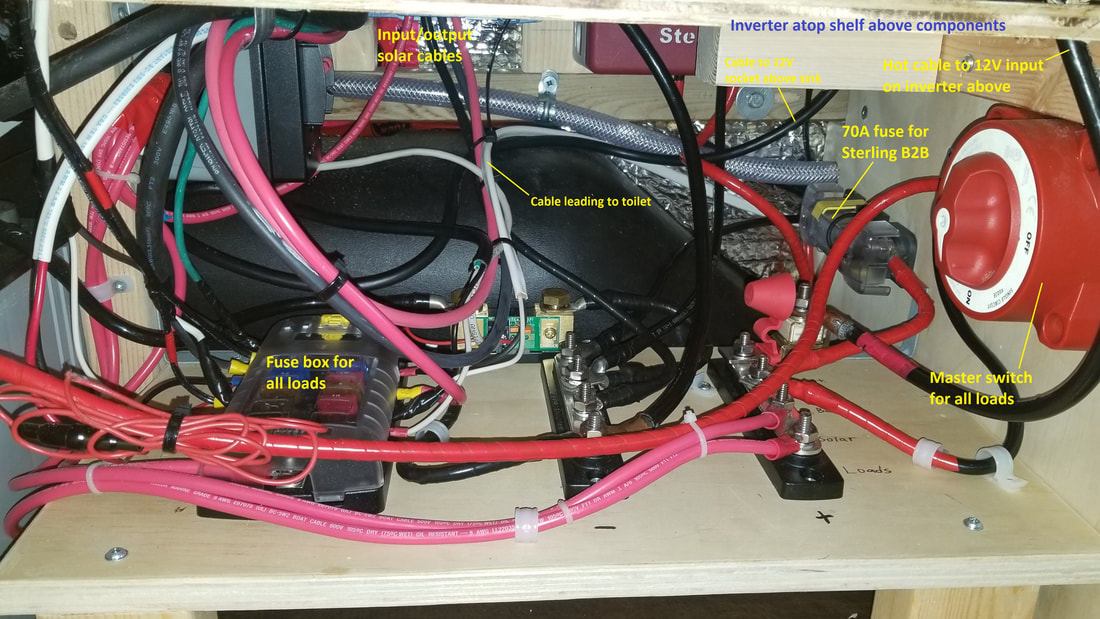
With my electrical compartment relatively small to conserve space, I had to carefully lay out where everything would get placed. The first two things I mounted was the Victron solar controller and the Sterling B2B units. I mounted them against the van wall in the back of the compartment just above the driver side rear wheel well. I then mounted a piece of flat plywood for the fuse box and busbar terminals to be located, and along the right side wall against the partition separating it from the refrigerator, I mounted the master switch and a 70A fuse for the Sterling B2B hot cable that runs inline between the Sterling unit and the positive busbar. I secured the 100Ah AGM battery just at the front edge of the water tank, whits sits nicely close to the busbars. The photos below show the setup with some labels. It may look like a mess, and while a real electrician would have made it neater, it all works!
While I did not intend to ever add an inverter, one day I noticed the Samlex 1000W pure sine wave inverter I liked was on sale for 35% off and I decided to buy it. When it arrived it was much larger than I anticipated and it barely fit inside my compartment! I had to build another shelf above all the components to hold it. The 12V input ports were on the left side which were easy to terminate the 2 gauge cables into. The 110V outlet on the right had two plugs, which I used two plug extensions to run one to the back of the van to wire in a standard wall outlet to provide power by the back doors. The second extension I ran to the wall above the counter and sink for another standard wall outlet there.
step 4 - wire outlets/sockets and electrical items
This was something that happened slowly over the course of a couple years, as progress of the finishing walls was completed. Once I was able to build a segment of wall where I wanted to add an outlet, I was able to cut out the required segment and wire in the outlet. Each cable was run just behind the tongue and groove wall panels for ease of access if repairs ever needed to be made.
Proudly powered by Weebly
