Materials used
- Engel Platinum MT35F-U1 AC/DC Fridge/Freezer ($1,000 on Engel website)
- One (1) pair of 18" soft close drawer slides ($21.99 at Home Depot)
- 2' X 4' piece of furniture grade 3/4" thick finished plywood ($25.74 at Home Depot)
- 2' X 4' piece of 1/2" thick birch plywood ($22.62 at Home Depot)
- Eight (8) 90 degree angle brackets ($2.59 each at Lowes)
- 1/2" long pan head wood screws pack of 50 ($4.68 at Home Depot)
- 3/4" long pan head wood screws pack of 50 ($4.87 at Home Depot)
- Kreg 1" screws and wood glue (Purchased earlier)
Total Material Cost: $1,112 US Dollars
tools used
- Table Saw
- Palm Sander
- Drills and Bits/Drives
- Kreg Hole Jig
- C-Clamps
- Pipe clamps
- Streightedge and Measuring Tape
- Palm Sander
- Drills and Bits/Drives
- Kreg Hole Jig
- C-Clamps
- Pipe clamps
- Streightedge and Measuring Tape
Time Spent on Job: 8 Hours
step 1 - build the refrigerator drawer
This proved to be very tricky as I had to get the measurments exacrly correct for a drawer of such a large size to fit perfectly. First, I had to install another partition to separate the grey water tank and the refrigerator. This partition would also serve as a support for the right side drawer slide. I decided to use a piece of 3/4" plywood for this. Since the fridge I bought is about 25.5" wide, I needed to make the space large enough to fit the fridge and the drawer box it sits in, plus an additional inch for the thickness of two drawer slides. Measuring and marking twice, I used angle brackets to install the partition. I then built the drawer box the fridge would sit in, making it exactly 1 inch narrower than the spot it would slide into. The bottom of the drawer box I used 3/4" smooth finished plywood, while for the sides I used 1/2" birch plywood. I cut each piece using the table saw freehand, and each of the 5 pieces were then glued together, secured with an abundance of Kreg pocket hole screws, and 8 angle brackets added for extra strength. I wanted to ensure this drawer box will be able to handle the 48 pound weight of the fridge.
When I test fit the drawer, it fit nearly perfectly. I just had to make a small adjustment to the partition I had just installed. Next, I installed the drawer slides onto the drawer, which required extensive measuring. Since thefridge is heavy, I drilled some additional screws to hold the slide onto the sides of the drawer. The 1/2" plywood sides could only take 1/2" screws so I needed to have more than just 3. I then secured one of the two pieces of Jatoba hardwood on the face of the drawer, screwing it on from the inside. Unfortunately, the upper piece was too warped to use and I wasn't able to get it to fit flush. Jatoba is a very hard wood and if it isn't perfectly straight when you buy it, it'll never be. I had to find a different specialty hardwood store in Denver (since I had purchased all my redwoods I used in the van from Crosscut Lumber in Seattle). Amazingly there are many options in Denver and I found a great store that had Jatoba in stock. Even though the grain won't match all the other Jatoba pieces I have in the van, it'll at least be streight! The last thing I did was run the power cable to a 12V socket where the cord could easily be unplugged when the fridge isn't in use. I had to find a way to allow the cord to move freely in and out when the drawer is opened. To keep the large drawer closed, I added another cam lobe I had available from the stock I bought off a fellow climber from Mountain Project to the adjacent door for the electrical cabinet. This lobe will swing around and secure along the edge of the drawer, keeping it closed until you swing the cam back to the left.
When I test fit the drawer, it fit nearly perfectly. I just had to make a small adjustment to the partition I had just installed. Next, I installed the drawer slides onto the drawer, which required extensive measuring. Since thefridge is heavy, I drilled some additional screws to hold the slide onto the sides of the drawer. The 1/2" plywood sides could only take 1/2" screws so I needed to have more than just 3. I then secured one of the two pieces of Jatoba hardwood on the face of the drawer, screwing it on from the inside. Unfortunately, the upper piece was too warped to use and I wasn't able to get it to fit flush. Jatoba is a very hard wood and if it isn't perfectly straight when you buy it, it'll never be. I had to find a different specialty hardwood store in Denver (since I had purchased all my redwoods I used in the van from Crosscut Lumber in Seattle). Amazingly there are many options in Denver and I found a great store that had Jatoba in stock. Even though the grain won't match all the other Jatoba pieces I have in the van, it'll at least be streight! The last thing I did was run the power cable to a 12V socket where the cord could easily be unplugged when the fridge isn't in use. I had to find a way to allow the cord to move freely in and out when the drawer is opened. To keep the large drawer closed, I added another cam lobe I had available from the stock I bought off a fellow climber from Mountain Project to the adjacent door for the electrical cabinet. This lobe will swing around and secure along the edge of the drawer, keeping it closed until you swing the cam back to the left.
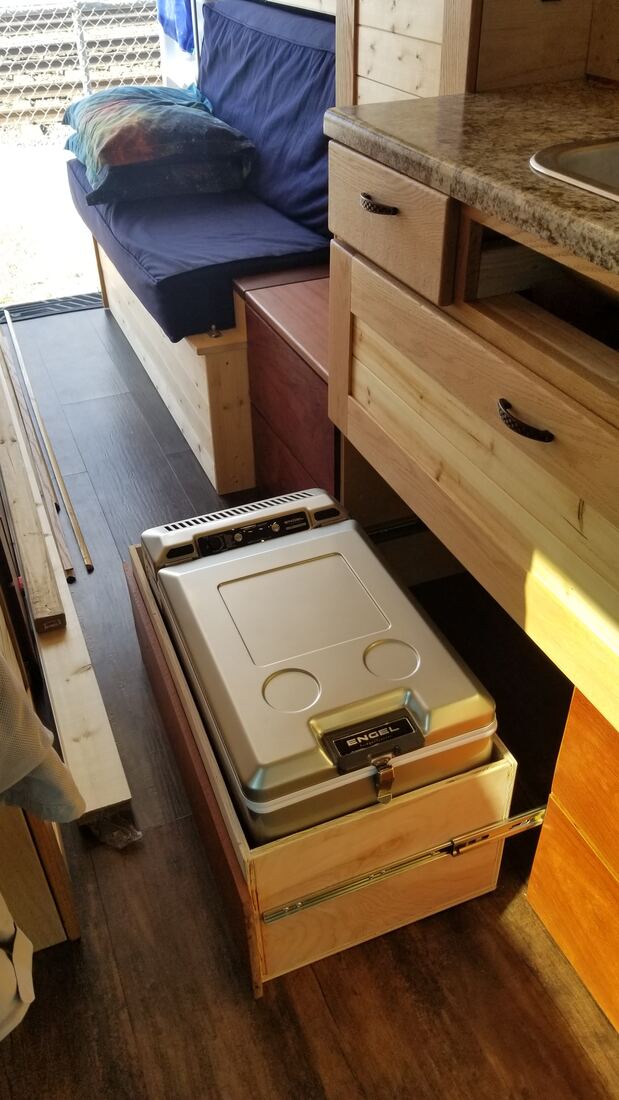
Complete fridge setup (minus the upper piece of Jatoba facial board)
Step 2 - Wire in the fridge
This ended up being very easy. The cable included with the fridge simply plugged into the port on the side. I then cut the 12 volt socket end off the other end of the cable and exposed the two positive and negative leads and wired them to the fuse block. I had to drill a small hole in the plywood partition separating the drawer box under the sink with the electrical compartment to allow the cable to pass through. I believe I used a 5 amp fuse for the fridge. Once wired in, I secured the extra cable so it wouldn't get caught when opening and closing the refrigerator drawer, and tested it out. It worked!